


Inventorium User Manual
Its not often that a Addon comes with such good documentation i was just about to start writing a guide about how to setup and use it and then Zerotorescue told me he had already done one , What can i say wow its great so here it is . I will be doing a post as well with further hints and tips but have fun setting this up and as here is the Great setup Guide
Zoxy
You can download this addon from Curse here
Introduction
This Inventorium user manual should give you an indication of how to use the addon. This should be a great introduction to the addon but also be helpful when you need to find out why it is doing certain things (especially the related settings might help so you can quickly see the involved settings).
When the image quality is poor zooming in or out might improve it (125% seems to be most favored on my screen). If you are viewing this online at Google Docs then downloading the file (File -> Download Original) might be a major improvement too.
Additional information about the addon can also be found in-game at the “Help” category of the config. Be sure to check that out if you have any issues.
Index
Installing Inventorium
Download Inventorium from Curse and install it into your addons folder like normal. If your World of Warcraft client is still running you may need to completely restart it for the game to start detecting the addon.
Additional requirements
- For item counts you need an item count addon such as DataStore (included with Altoholic) or ItemCount.
- For auction values you may want an auction database addon such as Auctioneer, Auctionator, AuctionLite, AuctionMaster or similar. This is optional though and Inventorium can function without them (but it won’t display any auction values).
- For queuing you may want a trade-skill window addon such as AdvancedTradeSkillWindow, Cauldron, GnomeWorks or Skillet. This is also optional and Inventorium can function without any of them (but the crafting functionality will be limited).
You can run multiple item count, auction database or tradeskill window addons simultaneously. Inventorium will always try to use the preferred addon selected in the config, or, if that addon isn’t enabled, the first one supported.
Configuring a group for the first time
To start configuring Inventorium right-click the minimap icon, write /im c in your chat-box or go to the addons settings by hitting escape, going to “Interface” and then selecting the “Addons” tab at the top.
The first page of the config will show you something similar to the image below. Adjust your general settings exactly as you wish. To get a description of what an option does you can hover over it with your mouse.
The following options were changed in the image below:
- “Do not alert at” was set to a raiding character (“Zerotorescue”) because I only require notifications on my banking characters.
- “Include in local item data” had “Auction House” unchecked.
- “Always show auction value” was toggled on because I like seeing the value of items, even though I don’t filter my crafting based on it.
- “Include guild bank data” had a raiding guild unchecked, because the contents in that guild bank are not mine and should not be used in item counts.

After taking note of all options in the “General” category and changing some things here and there, it is time to make your first group. Click the “Groups” category at the left side of the config window to open it. You will see a screen like the one below, enter a group name (e.g. “Glyphs”) and hit enter to add the group.

Now a new category with the name you entered will appear (let’s assume it’s also called “Glyphs”). Click this category in the list to the left to view a screen such as the one below.

This screen will have almost identical options to the “General” category but with a twist; everything has an “override” box in front of it. By default options selected in the “General” category will be used if an option is not being overridden. So as you can see all options we changed earlier (such as “do not track at” and “include in local item data”) are identical to the values entered there (although grayed out). To change a setting, click the override option in front of it and then change the setting itself, such as done in the screenshot below. The most notable changes are “track at”, which is set to only include my Scribe and “Alert when below local minimum” is toggled off because this character doesn’t actually post anything at the auction house.

After the settings are exactly as you wish, go to the “Add Items” tab to select which items are managed by this group. Again you are recommended to take a look at all possible ways to add one or multiple items.

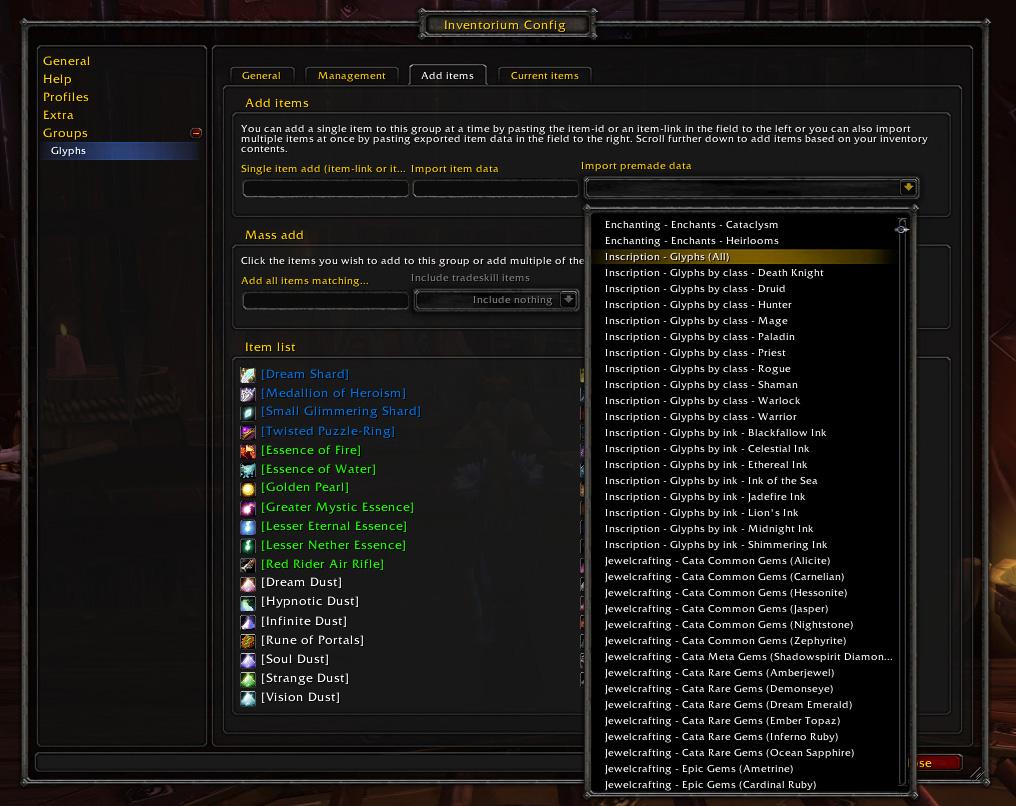
To quickly add a lot of items, you can use premade item data (this is a list of items already grouped for you by Inventorium). Select a premade item data-group at the “Import premade data”-dropdown box and every item within this premade item data-group will be added to your group. If a premade item data group is changed in an update to Inventorium it will automatically be updated in your group. Because in our example we are using a single group to manage our Glyphs, we select the premade group “Inscription – Glyphs (All)” (as seen below) to instantly add all glyphs in-game to the group.
Click the “Current Items” tab to review the items added to the group. Here you can also remove items as you wish.

Enough settings should be provided for a good enough configuration; you can now close the config window.
Summary
After configuring a group properly it should now appear in your summary window (unless your character isn’t selected within the “track at” setting). You can open the summary by left-clicking the minimap icon or writing /im s in your chat-box. A window such as the one below will appear.

Within this window you can quickly see the item counts and auction values for the items added to a group and abiding the filters you entered for this group. The auction value will only be shown if you have an auction database addon installed and set either the “price threshold” above zero or enabled the “always show auction value”-box in the config.
Related settings
- Track at (for hiding groups)
- Processing speed (slider at the summary window, for increasing the caching speed)
- Always show auction value (to also cache the auction value even though this isn’t used for any filters, this increases time required to cache all item data)
- Minimum local stock
- Minimum global stock
- Show in summary when below (hide the item if you have more than X percent of the required stock)
- Price threshold (minimum auction value required for the item to be queued or shown)
- Hide when below threshold (if checked, the above will also function in the summary, otherwise it only works when queuing)
Trade-skill queuing
To restock items by crafting them with your profession you must first open the specific profession window. In our example case of Glyphs, we’ll log into the crafter and open the Inscription profession.
To start queuing Glyphs you can now either open the summary window and hit the “Queue All” (to try to queue items from all tracked groups) or the group-“Queue” (to try to queue items from that one group) button. You can also control left-click the minimap icon or write /im q into your chat-box to queue items from all tracked groups without having to open the summary window (but you still need to ensure one of your profession windows is open).

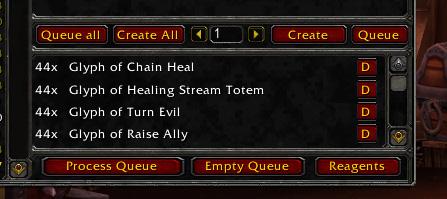
After preparing a queue (with any of the above actions), the screen below will appear showing you everything that has to be restocked and can be crafted with your current profession. Click the button at the right top to expand the “Unqueueables” screen displaying which items in your group(s) couldn’t be queued and why, as also displayed below.

In this example screenshot the “Unqueueables” window only indicates certain items were not craftable with your current profession but it can display a variety of reasons (such as not abiding to the auction value threshold, already fully stocked or when the missing amount is less than the minimum crafting queue requirement).
With the red X at the right of each item in the list you can remove items to prevent them from being processed and with the buttons at the bottom of this window you can choose to add everything in the list to your favorite crafting addon’s queue (“Queue”) or to start crafting the first item of the list (“Craft”). This first button requires one of the supported crafting window addons to be installed and enabled. Currently they provide more crafting functionality than Inventorium itself and are recommended over using the Craft button.
Hitting the “Queue”-button moves everything into your crafting addon as you can see below (using AdvancedTradeSkillWindow as example trade-skill window addon).
Related settings
- Track at
- Restock target
- Bonus queue
- Don't queue if I only miss
- Price threshold
- Crafting addon
Merchant restocking
Inventorium can automatically restock items from merchants when visiting one that sells something below the minimum required amount. Because Glyphs aren’t for sale at vendor, we will need a new group to demonstrate this. Parchments are a great way to earn a few gold now and then by selling them on the auction house. They are sold by various vendors for just a few copper up to 50s each.
Create a new group just like we did for Glyphs and give it an appropriate name (e.g. “Parchments”).

Then adjust some settings here and there…
Tip: use increments of the stack sizes and disable the bonus queue to optimally use your bag space.

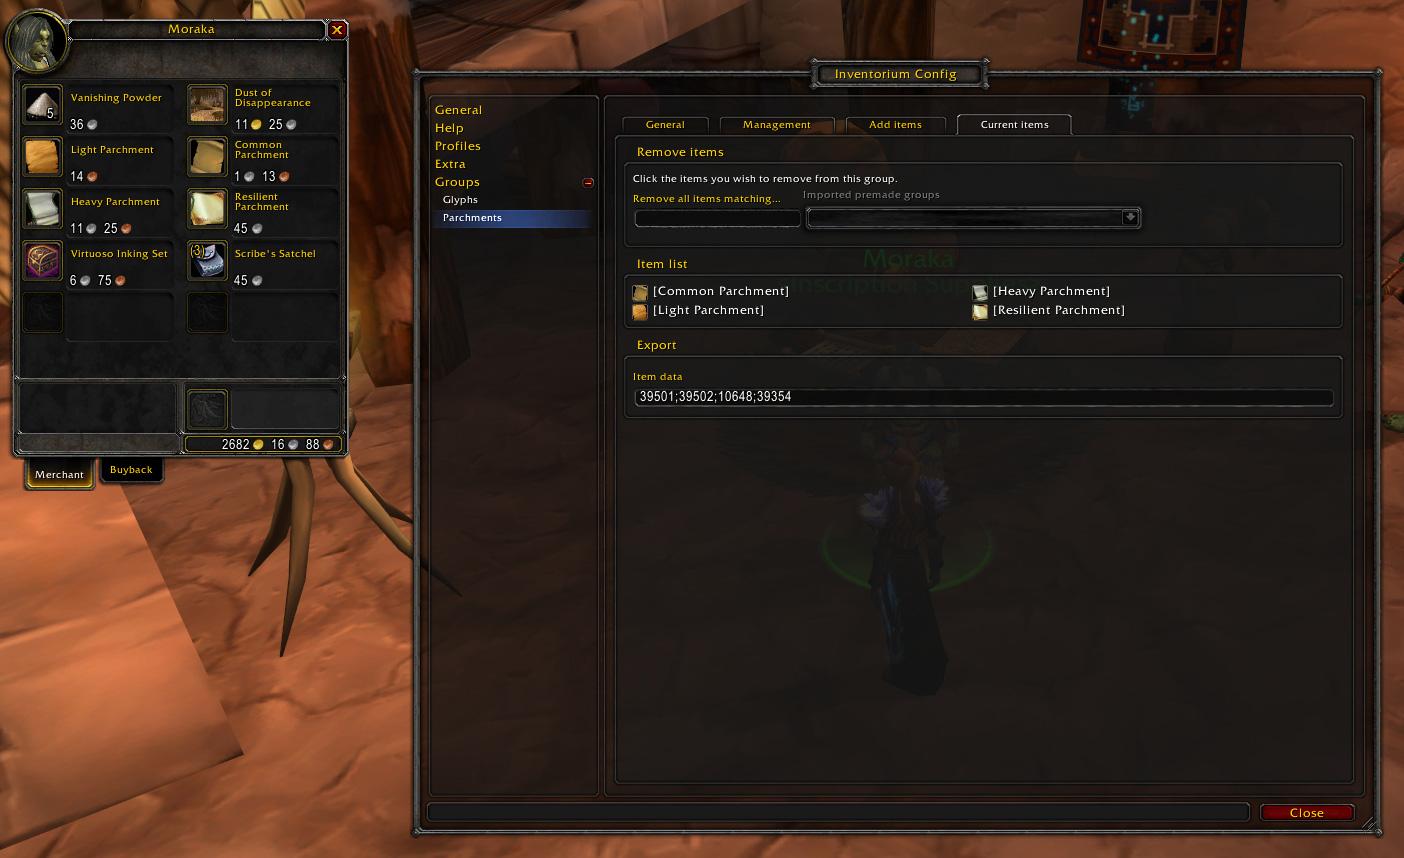
And now we can add the items. There are multiple ways to do so, one is buying at least one of each parchment and then clicking them in the item list or mass adding them, the other is to shift-click the item link into the “Single item add”-textbox. Talk to the Inscription supplies vendor next to an Inscription trainer within any capital city and open the “Add items” tab of your config window. Click the “Single item add” box and then shift-click an item link and then hit enter (or click the “Okay”-button) to add it to your group.

Do this for every single parchment…

Finally verify if all items are in the list at the “Current items”-tab.
Now everything should be prepared properly and you can close the merchant and config windows.
Now whenever you talk to a merchant selling these items (while the group is tracked at your character), you will be prompted to restock them if needed as shown below.

Upon hitting the “Purchase items” button everything is bought and put into your bags automatically.
All done!

This makes restocking on vendor items you sell on the auction house a lot easier.
Example uses
- Parchments
- Vendor recipes
- Ink (to sell at the auction house)
- Dungeon materials (such as reagents for spells)
Related settings
- Track at
- Restock target
- Bonus queue
- Don't queue if I only miss
Storage refilling
Inventorium can also refill from storage such as your bank, a guild bank (tab) or your mailbox (although limited to the 50 mail cap). If your local item count (by default this includes any items in your bags or at the auction house of your current character, but this can be adjusted by changing the “Include in item count” option) is less than the “Minimum local stock” and your storage contains this item, you will be prompted to refill when opening the storage such as displayed below.

Upon hitting “Move Items” the items in the list will be moved out of your storage on top of local items and result in a situation as shown below.

Example uses
- Parchments (e.g. keep a stack of each parchment in your bags and 1 or 2 additional stacks in your bank for refilling)
- Vanity pets (e.g. keep 2 of each in your bags and additional in your (guild) bank)
- Glyphs (e.g. keep a stack in your bags and another stack in your (guild) bank)
- Gems (e.g. keep 2 of each gem in your bags and additional stock in your mailbox)
- Flasks, bandages, other raiding equipment
Related settings
- Track at
- Minimum local stock
- Include in local item count
- Auto refill from storage
- Skip the confirmation window for storage refilling (located at the “Extra” category)
Stock alert
To inform you about items which are low on stock you can choose to see an alert similar to the one shown below. This is shown automatically for selected characters after logging in but can also be opened by middle-clicking the minimap icon or writing /im a in your chat-box.
You can exclude characters from receiving this alert by selecting them in the “Do not alert at”-select box. This can be done for all groups simultaneously in the “General” category, or on a per-group basis in each group’s options.

Related settings
- Track at
- Do not alert at
- Minimum local stock
- Alert when below local minimum
- Minimum global stock
- Alert when below global minimum
- Stock scan speed (located at the “Extra” category)

Credits
The entire Inventorium addon (including this manual) has been completely written by Zerotorescue. The general idea behind the config was based on the config found in Quick Auctions 3 by Shadowed (other than that basic idea, this person is completely unrelated to this project).
A big thank you to everybody providing feedback in any way (such as reporting bugs, suggesting new features, asking questions, etc.). You have helped a lot while building this great addon.
Another big thank you to everybody that has donated money. Your generosity is very much appreciated and acts as a great motivator. It helps pay for the WoW accounts used to test this addon.
Main contributors
- Zerotorescue (Al’Akir-EU) – main developer & manager
Mentions
Inventorium hasn’t been mentioned anywhere yet.
Zoxy note : This guide comes as a PDF in the addon folder and also is online as as google doc here
No comments:
Post a Comment